Angel Beats! Operation Wars (エンジェルビーツ!オペレーションウォーズ, Enjeru Bitsu! Opereeshon Woozu) is a social puzzle game based on the Angel Beats! series, released for the iOS and Android devices. The game allows players to collect cards with illustrations of various characters from Angel Beats! as well as fight the Shadows alongside the Shinda Sekai Sensen. On March 10th, it was announced that service for the game will terminate on May 10th, 2016.
As in most card collection games, the cards available to the game belong to a category based on the relative difficulty of acquiring that card or rarity. Operation Wars has four kinds of rarity for playable cards.
Normal (N) (★)
Rare (R) (★★)
Super Rare (SR) (★★★)
Super Super Rare (SSR) (★★★★)
Color[]
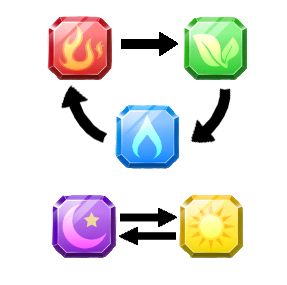
In Operation Wars, all cards and enemies are assigned with one of five colors: Red, Blue, Green, Yellow, and Purple. According to the color of the card and the color of the enemy Shadow, damage dealt by that card (excluding High Tension Mode) is doubled or halved.
Gameplay[]
User Interface[]
The Status Bar at the top of the screen displays the player his/her level and amount of experience needed to reach the next level, the name of the player's Battle Front, player's nickname, the amount of AP or Action Points, and the amount of Beats!, the in-game currency, the player holds.
Home Page[]
The top left features access to the mailbox, incoming friend requests, the Angel Beats! Operation Wars comic, and choice to replay the event scenario. The top right shows the amount of food coupons the player has separated by type. The center displays a zoomed view of the illustration of the card serving as operation leader, which, upon tap, shows character lines exclusive to the card and plays the voice acting of those lines, if available. Each SSR-rarity card has its own 3 distinct voice acted lines, and each character has 3 default voice acted lines with his/her N-rarity cards. R and SR cards do not have voice acted lines.
Below the center comprises access to Operation and Live and special Event portals.
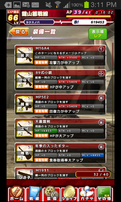
Operation[]
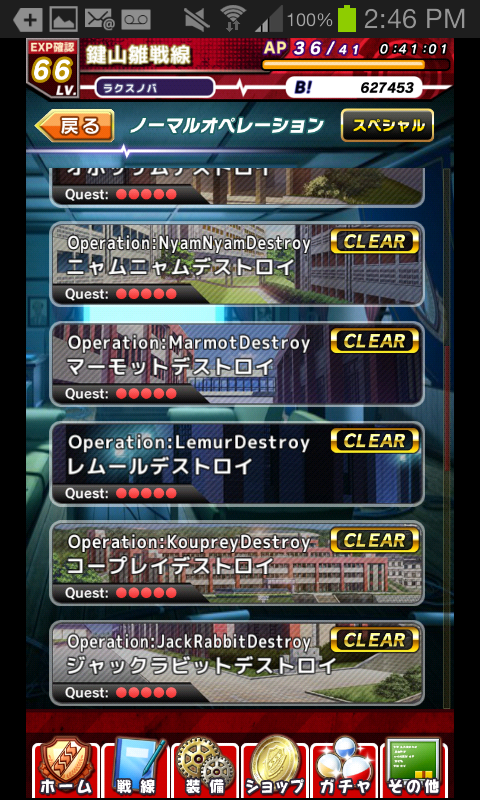
The Operation page is categorized into Normal and Special operations. Each operation offers sub-operations of stages in the Normal section and various difficulties in the Special section. Normal operations are gradually unlocked upon completion. Special operations rotate according to the day of the week and include event operations. Sub-operations cost AP to start and may have Quests assigned that reward in terms of food coupons, friend points, and consumables. After selecting a sub-operation, the player is prompted to choose a friend or another player to assist him/her in battle, and then the player can assemble his/her team. After the operation, experience, Beats!, a low amount of food coupons, and/or cards are rewarded.
Each Normal sub-operation rewards 5 Medals upon first completion and 5 Medals upon completion of all quests. An end stage sub-operation rewards 15 Medals upon first completion and unlocks a new operation. Medals are used to buy consumables in the Shop page.
Types of Quests[]
Character Quests
[Character] must be in the team
[Character] must be the Leader
Use only [Character]
[Character] must be assisting
Live Quests
Must be undergoing Live in [Location]
[Character] must be undergoing Live
Must NOT undergo Live
Girl Dead Monster must undergo Live
Equipment Quests
Must use a piece of equipment
Must use a piece of equipment with Grade above +N
All characters must activate their skills
Must NOT use any skills
Team Formation Quests
[Number] of Characters must be used
Use only [Color] cards
Use only Male/Female characters
Use all 5 colors
Use only Girl Dead Monster characters
Total cost of the team must be a factor of [Number]
Challenge Quests
[Number] of blocks must be cleared in total
[Number] of blocks must be cleared in one swipe
Odd/Even number of blocks must be cleared
Must complete under [Number] turns
Deal over [Number] total damage
Must complete with one character left alive with [Percentage] HP remaining
No one must die
No continues (Alarm Clocks) must be used
Boss Stage must be completed in High Tension Mode
Must complete WITHOUT using High Tension Mode
Must NOT clear any [Color] blocks
Time Sensitive Quests (Japan Time, UTC+09:00)
Must Complete between 07:00 - 12:00
Must Complete between 15:00 - 19:00
Must Complete between 19:00 - 24:00
All quests except "[Character] must be assisting" and "Deal over [Number] total damage" do NOT include the assisting member in calculation.
Many quests can be completed first try, some of them require redoing the quest with a different strategy, some of them require a lot more thinking, and a few are difficult, late game quests. Commit and go for those medals!
Special Operations[]
The special operations page gives the player access to Daily Rotation and Event operations.
Daily Rotation operations include:
Slot Unlocking Operation: The player can unlock the 3rd and 4th slots of various characters, which rotate based on the day of the week. It is recommended that new players complete these operations as soon as possible since more slots mean higher stats. These operations are also useful for gathering medals after the player's characters become strong enough to withstand high damage alone during the battle.
Elemental Operation: These extra operations only allow certain color blocks on the playing field based on the days of the week (月--Moon Monday, 火--Fire Tuesday, 水--Water Wednesday, 木--Wood Thursday, 金--Gold Friday, 土--Earth Saturday, 日--Sun Sunday). Since there will be only three colors and Heart Orbs spawning on the playing field, the player should plan his/her team accordingly to not waste any team slots. The survival of the team should not be a problem, even if slightly under-leveled, due to the high spawn rate of Heart Orbs.
Daily Drills: Instead of earning medals via destroying the Shadow, the player can do daily drills with members of the SSS to earn up to 5 medals. Upon finishing the drill, one medal is awarded; other four medals are earned through drill quests.
Live[]
The player may choose between five locations to perform Live to gain food coupons and a temporary damage buff:
Cafeteria: 3 hour Live, no buff. Cost: 50000 Beats!
There are four types of food coupons:
Meat Udon Coupon
Omurice Coupon
Curry Coupon
Mapo Tofu Coupon
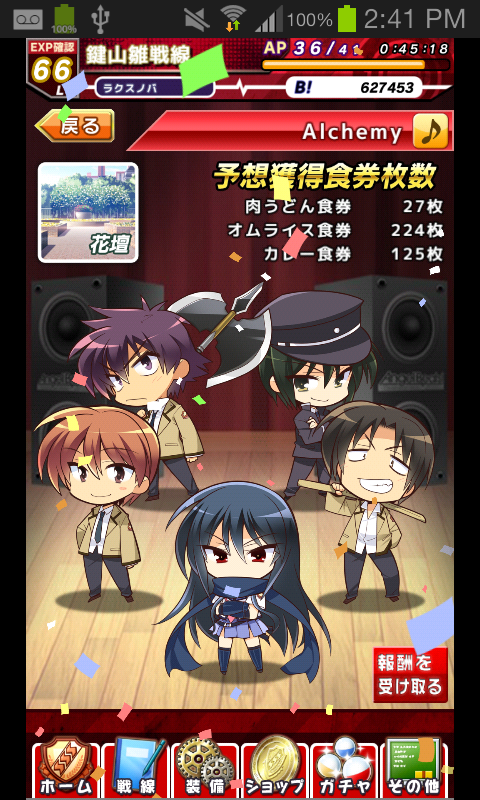
After choosing the desired Live location, the player can choose the characters to go on stage. The color of the character affects which type of coupon is gained:
Red: High Curry, Medium Meat Udon, Very low Omurice
Green: High Omurice, Medium Curry, Very low Meat Udon
Blue: High Meat Udon, Medium Omurice, Very low Curry
Purple: High Curry, Medium Omurice, Low Meat Udon
Yellow: High Meat Udon, Medium Omurice, Low Curry
Pieces of equipment with Food Coupon Up effect would increase the amount of food coupons gained.
The player may choose between four songs to perform. If the player starts an operation while undergoing Live, the chosen song will be played as BGM instead of the default BGM on the playing field.
Song List[]
Crow Song
Alchemy
Thousand Enemies
My Soul, Your Beats! (Gldemo ver.)
Little Braver (Album ver.)
Last Song
Random choice of the 6
Characters while performing Live cannot participate in Operations.
Battle Front Management[]
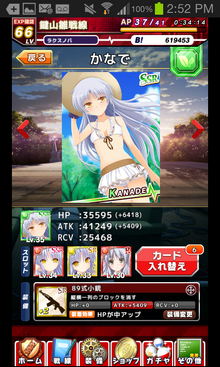
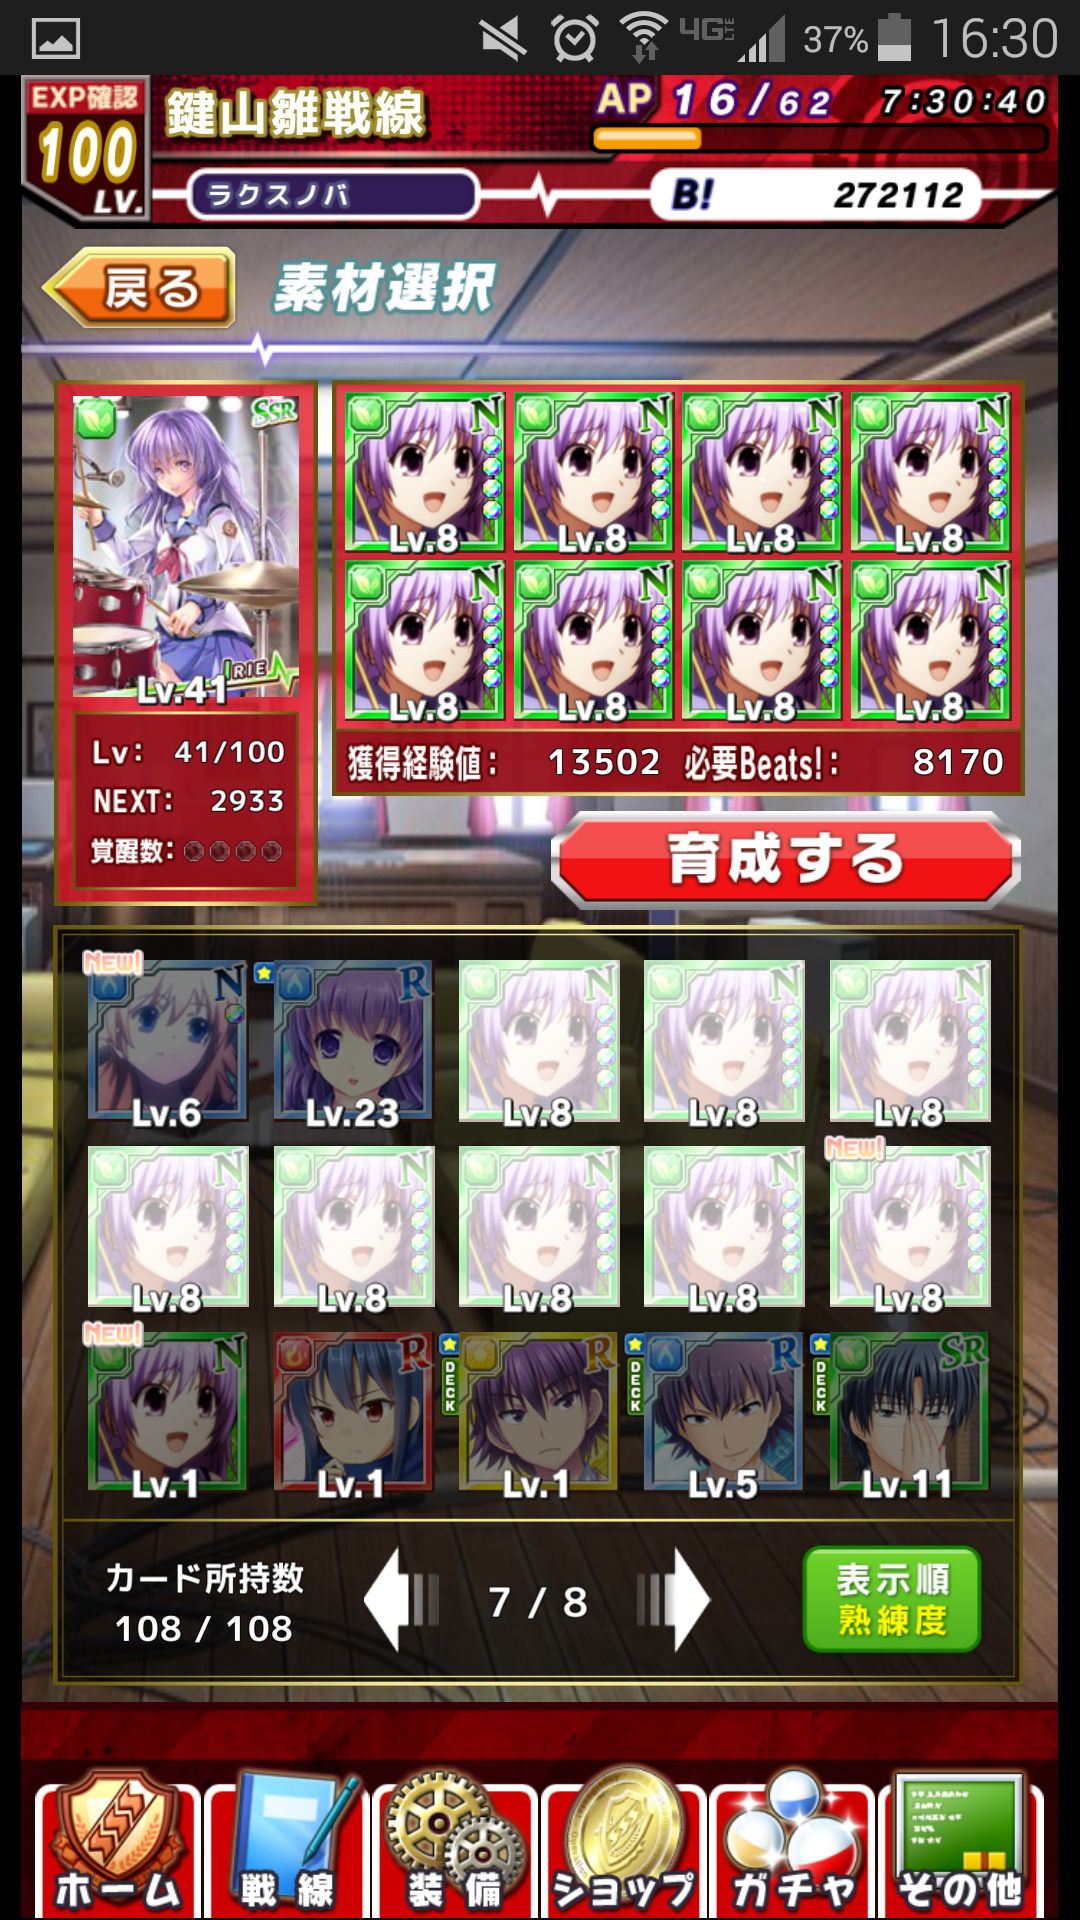
In Battle Front Management, the player manages the card deck and equipment and can view all the cards he/she possesses. Each character has four slots available for cards (two slots are initially open; 3rd and 4th slots must be unlocked through special operations.). The color of the character is determined by the color of the card in the 1st slot, and the Power Level of the character is the sum of the stats of all slotted cards and the piece of equipment. Each card has a cost value and can be restricted by the cost limit determined by the player level. It is possible to exceed the cost limit, but the stats of the card that exceeded the limit (and that card only) will be penalized.
The player has a maximum amount of cards he/she can possess. The player cannot proceed to Operations, Live, or Gacha unless he/she reduces the card count by leveling or selling.
In leveling up, cards of the same color grants 10% extra experience, and cards of the same character gives 10% extra experience. If the exact copy of the card is consumed, the card grants 20% extra experience and Limit Break, which increases the maximum level of the target card by 5. Limit Broken cards give more experience than their unbroken variant of the same level. Each card can be Limit Broken 4 times. Limit Break Maxed cards give an extra 41.5% EXP. During consuming, there is also a low chance to get a "Great" 1.5x or "Perfect" 2.0x EXP boost.
Equipment Management[]
In Equipment Management, the player can develop new equipment via Gacha system using earned food coupons, combine or sell pieces of equipment, and view all owned pieces of equipment. There are three classes of equipment, Normal, Rare, and Super Rare. The player can choose how many food coupons of each type is spent per gacha between 50 to 999 units. A minimum of 3 Mapo Tofu coupons can be spent to get a piece of equipment with the minimum rarity of a Rare.
Each piece of equipment comprises a flat stat boost (either HP, Attack, or Recovery), a skill, and possibly a special effect.
List of Skills (Unofficial names)[]
4 Clear: Eliminates 4 blocks around the skill orb
8 Clear: Eliminates 8 blocks around the skill orb
12 Clear (Rare): Eliminate 12 blocks around the skill orb
Horizontal: Clears the row where the skill orb is located
Vertical: Clears the column where the skill orb is located
Cross (Rare): Clears both row and column where the skill orb is centered
Small Attack Up: 2x Damage for that turn only (multiplies with elemental bonus/penalty)
Large Attack Up (Rare): 3x Damage for that turn only (multiplies with elemental bonus/penalty)
Conversion: Converts a few blocks to the color of the character
High Conversion (Rare): Converts more blocks to the color of the character
Explosion: Clears all blocks with the same color
Types of Special Effects[]
Special Effects work in percentages.
HP Up
Attack Up
Recovery Up
Beats! Gained Up
Food Coupons Gained Up
These special effects boost stats in increasing percentages as you combine and upgrade them.
Low grade (小): Starts at +5%. Increases 1% per upgrade. Max +15%.
Medium grade (中): Starts +20%. Increases 1% per upgrade. Max +30%.
High grade (大): Starts +30%. Increases 2% per upgrade. Max 50%
Combining[]
When the player acquires copies of a piece of equipment, he/she can choose to combine them to a higher Grade. The higher the Grade, the higher the flat stat increase and special effect percentage boost. The lowest grade is +0, and the highest grade is +10, which shows as "MAX". If the two pieces of equipment have different skills, the player has to choose one and sacrifice the other. Once the piece of equipment upgrades to a certain level, a level of Risk kicks in. The level of Risk indicates the chance of failure and consequences of failure. There are three levels:
Low Risk: Low fail chance; if failed, the secondary piece is destroyed.
Medium Risk: Medium fail chance; if failed, the secondary piece is destroyed, and the primary piece has a chance to degrade one level.
High Risk: High fail chance; if failed, the secondary piece is destroyed, and the primary piece has a chance to degrade up to two levels.
When combining, the player can only use a piece of equipment that has higher or the same grade than/as the secondary as the primary. The grade of the secondary piece can affect the risk level; the more similar the two pieces of equipment are, the lower the risk. For example, two pieces with +4 and +0 will have Low Risk, and two pieces with +4 and +2 will have zero risk.
Shop Page[]
In the Shop, the player may purchase consumables with Mobage coins or Medals, fully restore AP using Key Coffee, or expand card/equipment inventory. The player can also access the event shop when it is available.
Alarm Clock: Revival of all team members. 100 Mobage coins or 10 Medals
Mapo Tofu Coupon: 100 Mobage coins or 10 Medals
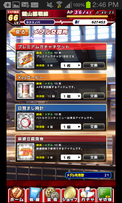
Gacha Page[]
The Gacha page is the go-to place for new cards and leveling material. The player can spend Premium Gacha Tickets, Friend Points, and Food Coupons to acquire new cards, but he/she can also buy Mobage coins to spend on the Premium Gacha. The player also gets one daily free gacha. There is also a rare SR 12% Gacha only accessible with a SR 12% Ticket gifted or purchased through events.
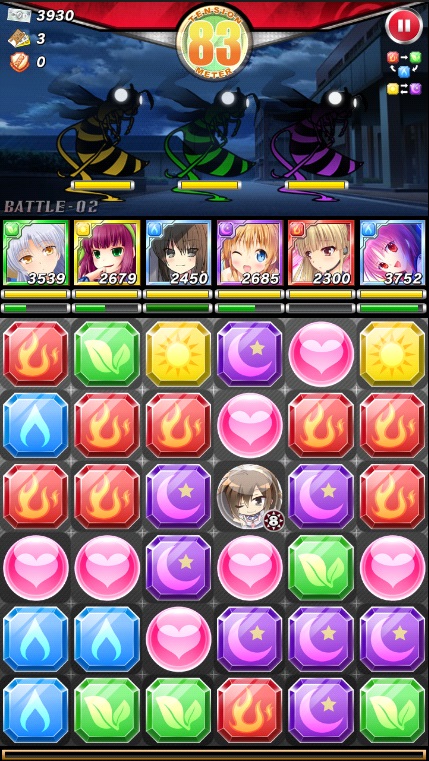
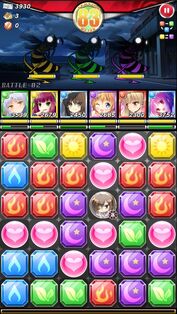
Puzzle Element[]
The playing field is made up of a 6x6 square filled with different types of blocks:
Colored Blocks
Heart Orbs
Skill Orbs
High Tension Activation Block
The player may clear a minimum of 2 blocks and a maximum of 36 blocks. The cleared blocks, depending on their color, translate to damage done or HP recovered by characters enrolled in the current team. The player may tap a Shadow to set as priority target. After the first slide, the timer bar below the field starts to decrease. The player may not clear anymore blocks after the timer bar decreases to zero until the Shadow takes action and a new turn starts. Clearing blocks adds additional milliseconds to the timer.
High Tension Mode[]
Below the Status Bar in battle, there is a Tension Meter which rises from 0 to 100 as the player clears blocks/orbs. Once the meter reaches 100, a High Tension Activation Block will drop into the field instead of the other blocks; the player may tap the Activation Block at any time to enter HTM.
In HTM, the normal playing field will be swapped to a field that spawns blocks in random patterns. Each of these patterns can be cleared in one slide, and the pattern changes immediately after each slide. Blocks cleared in HTM translate into Neutral Damage, damage dealt strictly to the number, not affected by color. If every block in the pattern is cleared in one slide, it is considered a Perfect slide, and more damage is done.
The player CANNOT heal his/her team in HTM. Estimate how much HP does the target Shadow have and note the range of damage of the remaining Shadows that could be dealt collectively to a single team member (if full survival is desired), and then decide whether activating HTM or trying to heal the team is the better course of action.
Card Leveling[]
This section lists the various drops you can obtain in Normal operations. All drops are assumed N-rank unless specified. Feel free to expand and add drops that are not listed, would appreciate the help.
This section is created for the purpose of card power leveling. Once a player reaches a power cap and cannot advance further in the Normal operations, he/she can use the AP to grind N-cards instead. Limit Broken N-cards give extra experience up to about 41%, not including color and character bonuses, so, on top of food coupon and friend point gacha, doing low level operations repeatedly is an efficient way of quickly upgrading your cards.
The cons of this process are that it requires a lot of Beats! (300K Beats! can be used in a blink of an eye) and that it gives a very low amount of Player experience. So make sure to frequently participate in events, which always reward a high amount of both.
Find the sub-operations that benefit the team the most, meaning all or most of the potential drops from the sub-operation could be Limit Broken to level your characters, with low AP cost and without filling up your inventory space to the brim.
Use Ctrl+F in the format of [Color] [Character] for clarity.
Operations past Nyam Nyam have been ignored due to high AP costs per sub-operation.
Italicized items require further confirmation.
Training
Yellow Yuri, Blue Sekine, Green Irie
Yellow Yuri, Yellow Naoi, Blue Takamatsu
Purple Kanade, Green Otonashi, Blue Yui
Antbear
Blue Shiina, Red Matsushita, Blue Takamatsu
Yellow TK, Red Takeyama, Yellow Yusa
Purple Kanade, Green Otonashi, Red Hisako
Blackbird
Red Iwasawa, Red Hinata, Green Noda
Red Matsushita, Yellow Yusa, Blue Yui
Yellow Yuri, Yellow Naoi, Green Irie, Blue Yusa
Carrion Crow
Green Noda, Blue Sekine, Blue Yui
Red Takeyama, Blue Shiina, Purple Kanade
Yellow Yusa, Red Hisako, Yellow Ooyama
Dingo
Yellow TK, Yellow Ooyama, Yellow Yuri
Yellow Naoi, Red Hisako, Red Takeyama
Blue Sekine, Red Hinata, Yellow Ooyama
Eland
Red Matsushita, Yellow Naoi, Blue Takamatsu
Blue Shiina, Purple Kanade, Purple Fujimaki
Green Otonashi, Green Irie, Blue Takamatsu
Fallow Deer
Red Hinata, Yellow TK, Red Hisako
Yellow Ooyama, Green Irie, Green Noda
Red Matsushita, Red Iwasawa, Green Otonashi
Red Iwasawa, Red Takeyama, Yellow TK
Green Noda, Blue Yui, Blue Kanade
Giraffe
Red Ooyama, Purple TK, Red Shiina
Yellow Irie, Green Hisako, Red Naoi
Purple Yuri, Red Ooyama, Blue Fujimaki
Yellow Matsushita, Green Sekine, Purple TK
Green Iwasawa, Green Takamatsu, Blue Fujimaki
Horn Bill
Purple Hinata, Blue Kanade, Yellow Irie
Red Naoi, Green Takeyama, Red Shiina
Green Sekine, Green Iwasawa, Purple Yui
Green Hisako, Green Takeyama, Green Noda
Purple Yuri, Red Ooyama, Blue Fujimaki
Impala
Purple Hinata, Yellow Otonashi
Green Iwasawa, Red Ooyama
Red Shiina, Purple Yui, Green Hisako
Purple TK, Green Noda, Purple Yuri
Yellow Irie, Blue Fujimaki
Jack Rabbit
Blue Yusa, Purple TK, Green Noda
Blue Kanade, Purple Hinata
Red Shiina, Green Takeyama
Blue Yusa, Blue Kanade, Green Takeyama
Yellow Matsushita, Yellow Irie, Purple Hinata
Kouprey
Purple Yuri, Green Sekine
Green Takamatsu, Purple Yui, Blue Kanade
Green Sekine, Red Naoi, Yellow Irie
Green Hisako, Yellow Matsushita, Yellow Otonashi
Purple Yuri, Green Noda, Red Naoi
Lemur
Blue Yusa, Green Takamatsu, Purple Yui
Yellow Otonashi, Blue Fujimaki
Blue Yusa, Red Shiina
Yellow Matsushita, Green Hisako, Blue Kanade
Green Noda, Green Iwasawa, Red Naoi
Marmot
Blue Otonashi, Purple Yusa
Yellow Kanade, Yellow Hisako, Yellow Fujimaki
Blue Matsushita, Red Yuri
Yellow TK, Red Yui, Purple Yusa
Red Takamatsu, Yellow Fujimaki, Blue Otonashi
Nyam Nyam
Red Yui, Green Sekine, Yellow Takeyama
Red Noda, Purple Yusa, Green Ooyama
Green Shiina, Purple Naoi, Red Takamatsu
Purple Irie, Blue Matsushita, Blue Otonashi
Yellow Takeyama, Red Yui
Strategies[]
Approaching Event Super Difficulty Operations[]
For players that are relatively new (having trouble beating normal or hard), you should also read this walkthrough, for the strategy below can apply to almost all operations.
Here are some pre-requisites, in my opinion, for beating the Super Difficulty:
Recommended Power Level: 130K - 140K
Recommended HP: 40K - 50K (Translates to 4K - 5K on field). The approximate max damage of Super Difficulty shadows is 1950.
A team of fairly balanced characters, meaning your RCV cannot be too low.
Flowerbed Live (1.2x ATT)
Equip weapons that appropriately expand certain characters' strengths, such as equipping a +HP +RCV instead of a full +ATT for a character with already high HP and RCV.
Equip weapons that have fast recharging skills, such as 8 clears and Row/Column clears. These will not only deal more damage than their rare variants but also charge your high tension meter faster. But of course having Damage Up is also nice.
Walkthrough[]
Stage 1: This stage starts with all weak shadows, relative to later stages.
Goal 1: As you clear the shadows, stock as many Heart Orbs as reasonable, favorably half field of Heart Orbs and half field of blocks. This way if your team gets hit hard you can immediately recover to buy some time.
Goal 2: Fill up your High Tension meter and get the High Tension Mode block, but Do Not Activate HTM. It is needed in the next stage. You will see this pattern repeating.
Goal 3: Do not let anyone die. In fact, if anyone dies in the first stage, your cards are not ready for Super Difficulty.
Goal 4: Make sure your characters have at least above 3600 HP after stage completion. You don't want to risk anything.
Goal 5: Try to memorize how much you heal for 2 Heart Orbs, and 3, and 4, so on. This is important for the later stages, so you spend your orbs efficiently and have an idea of how many orbs to clear when you are spamming blocks of twos.
Stage 2: This stage will probably consist of weak shadows and mini-bosses. By mini-boss I mean a shadow with yellow eyes and can heal for very little. Immediately after you go into the stage, use your HTM. Reason is that you cannot heal in HTM; you will get hit after the first turn and will not have another window to use it. Now it seems the system automatically targets the weakest shadow, but, just to be absolutely sure that every damage counts, you should manually target. You should be able to tell how strong a shadow is based on its shape and eye color. Make sure to get at least 4-5 perfects and don't panic rush. You want to destroy the shadows with the lowest hp in one go. Why? Because they deal about the same amount of damage as a boss would.
Goal 1: Keep stocking Heart Orbs.
Goal 2: Get your second HTM block and keep it for stage three. Ride the rhythm.
Goal 3: Hopefully no one died.
Goal 4: Now make sure your characters have almost full health (>95%). No risk taking.
Stage 3 & 4: These stages will have bosses that can heal for real. But their healing means your healing. Keep the rhythm of using HTM at the first turn, destroying the weakest shadows, and survive. In these stages, it is okay to use multiple HTMs under these conditions:
There are two shadows or one healthy shadow left on the field
Your team is all around healthy (can survive a 3000 hit no problem)
The shadow heals
You can for certain get another HTM block within the stage (which takes 2-4 turns to charge)
If these conditions are met, then you may choose to activate HTM to make the operation go faster.
Goal 1: I can't hold all these Heart Orbs.
Goal 2: Save an HTM block for boss stage
Goal 3: I really hope no one died
BOSS STAGE: Congrats making it to the Boss Stage! Expecting something spectacular? Don't! It is just a harder stage 4 with the chance of one-shotting your entire team if you're not careful!
Rinse and repeat. Target the weaker shadows and finish them off first. Manage your heart orbs. Don't take any chances unless you know your team can survive. If your team dies, use your alarm clocks reasonably since you already made it this far.
Even though the Super Difficulty gives a lot more Beats! and experience, it is not worth it if all you get is double the chance to get a card drop. However, Super Difficulty is highly recommended for events that give concrete points.
This is not the textbook way to beat operations of high difficulty. Feel free to be flexible.
Early Game Medal Usage[]
If you decide that you should pay your way through this game, you shouldn't need to read this section.
One of the biggest obstacles and subjects to think about for a new player is how to spend your medals. A new player has so many resources he/she can access: there are the normal operations, the slot unlocking operations, daily drills, days-of-the-week elemental operations, and perhaps the midst of an event. Each time a sub-operation is completed, a large amount (in perspective of a late game player) of medals is rewarded; an early Normal operation with 5 sub-ops can reward up to 60 medals. So, how should a new player approach the economics of medals?
The spending of medals for a new player should revolve around one principle:
Become settled as soon as possible.
Settle your cards first: Fill your character slots as many as possible through operations, and do not bother with card leveling or undergoing live, not yet anyway. Spend your medals on gacha tickets, and hopefully you will get around 7-8 Rs or maybe even an SR/SSR in the mix. If a point-redemption event is ongoing, get the first Rs and SRs with low prices, then immediately go for the gacha tickets. Aim for cards with high cost, and be cautious using any Rs with cost of 4 since N-cards with cost of 5 are usually better in the short term. Try to be flexible with choosing which members to make up the operation team, don't get stuck with some special preferred compositionor with one sex and exclude the other (in the early game, anyway). Also have color diversity in your characters, and make sure they are evenly leveled. You will find the usefulness of having able teams of mono-color cards.
Settle your weapons next: Gather Mapo Tofu tickets and get about 4-5 good R weapons, hopefully ones with Medium grade special effect. The best weapons for early game are +HP +ATT weapons, so either melee weapon with percentage medium ATT increase or rifle with percentage medium HP increase (I prefer the latter). These weapons will benefit you greatly by enhancing card growth.
Save up gacha tickets: Once you have settled with a few good Rs and decent weapons, you should spend all your medals stocking up on premium gacha tickets. Save them until the next event with desired SR/SSRs, and try your luck with all bets down. But this is just a suggestion, you have free reign over your medals.
Do not buy Key Coffee or Alarm Clocks:There is just no point.First I should address alarm clocks. Do not believe in such a thing as "net zero" medal gain when you buy alarm clocks. Whenever you use a bought alarm clock instead of a free one, you are losing 10 medals. Say from a sub-operation, in which you spent the bought alarm clock, you get 10 medals, and you buy back the alarm clock; it is true that the number of left over alarm clocks did not change, but you have just wasted 20 medals that could have gone into two Mapo Tofu tickets. Second, Key coffees are absolutely inefficient when used in early game. You can easily wait for the energy to regenerate back in 4-5 hours once exhausted, and leveling up works the exact same way. Half Key coffee is even more inefficient at low levels; they are not efficient until level 100. Save these two items from daily and event log-in bonuses for the future.
Release[]
The game was announced for smartphones on December 27, 2013; pre-registration was also opened on that day. Those who pre-register for the game will receive an SSR Red Kanade Tachibana card. The game was released on June 30, 2014.


